
Google Analytics (GA) is a powerful tool that allows website owners to track and analyze their website’s traffic. Recently, Google released a new version of GA called GA4. If you’re a beginner who wants to start using GA4 on your WordPress site, this guide will walk you through the process step-by-step.
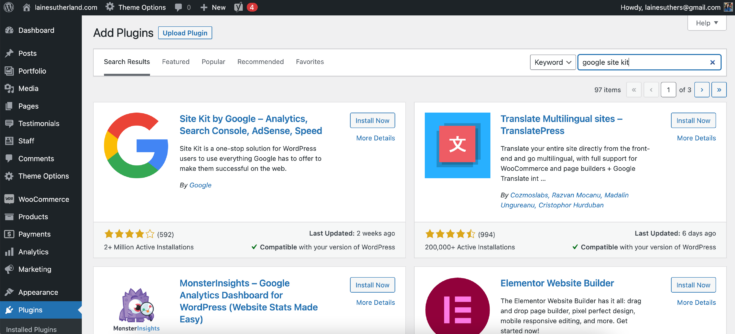
BEFORE YOU BEGIN: INSTALL THE GOOGLE SITE KIT PLUGIN ON YOUR WEBSITE
Step 1: Create a GA4 account

The first step is to create a GA4 account. If you already have a GA account, you can use that to create a GA4 account. To do this, go to the Google Analytics website and sign in with your Google account.
Once you’re signed in, click on the “Admin” button in the bottom left corner of the screen (it looks like a gear icon and will say Admin once you hover over it). You’ll see an option to “Create a property” – select this option.
From there you will be taken to a screen with some options to set up your property – fill in your property name (anything you wish it to be) and then click next.
Fill in the next step according to your preferences, and then click create.
Next, select “Web” as the type of property you want to create. Add your website URL & website name (stream). You can leave enhanced engagement on. Click create stream.
Step 2: Get the GA4 tracking code
Once you have created your GA4 account, you’ll need to get the tracking code for your website. This code is unique to your website and needs to be added to your site so that GA4 can track the traffic on your site. To find the tracking code, go to the “Admin” button in the bottom left corner of the screen and select the “Tracking Code” option. You’ll see a code that starts with “G-“. This is your GA4 tracking code. Alternatively, your tracking code will appear on the page after you complete the above steps. You will have the option to scan your website and installation instructions will appear, along with your tracking code.
Step 3: Install the GA4 tracking code on your website
The next step is to add the GA4 tracking code to your website. To do this, you’ll need to install a plugin mentioned above, on your site. This plugin allows you to easily add your GA4 tracking code to your site.
- Once the plugin is activated, on the left-hand side, click Site Kit.
- Click Sign in With Google.
- Click Sign in With Google
- Select the Google account with an existing Google Ads or Google Analytics property.
- After granting permission, verify site ownership by clicking Proceed.
- Grant access to Google account data by clicking Allow.
- Click Add site to add the site to Search Console.
- You have now configured the plugin.
- Click Go to my Dashboard to continue.
- From the menu on the left, select Site Kit, then Dashboard.
- In the Analytics section, click Connect Service.
- Sign in with the same Google account as you used before.
- Grant additional permissions by clicking Continue.
- Choose your pre-existing analytics property then click Configure Analytics.
Step 4: Verify that the tracking code is working
Once you’ve added the GA4 tracking code to your site, you’ll need to verify that it’s working correctly. To do this, go back to your GA4 account and click on the “Real-time” button in the bottom left corner of the screen. You should see some data showing that your site is being tracked. If you don’t see any data, check to make sure that you’ve added the tracking code correctly.
NOTE: It can take up to 48 hours for data to be processed.
Step 5: Start analyzing your traffic
Once your GA4 tracking code is working, you can start analyzing your website’s traffic. There are many different reports and metrics that you can use to analyze your traffic, such as the number of visitors, the pages they visit, and how long they stay on your site. You can also set up goals, such as tracking the number of conversions from your site. With GA4, you can also analyze your data in more depth, like user behavior, and more.
In conclusion, GA4 is a powerful tool for analyzing the traffic on your website. By following these simple steps, you can add GA4 to your WordPress site and start tracking and analyzing your website’s traffic. With GA4, you can gain valuable insights into how your site is performing and use this information to improve your website and attract more visitors.